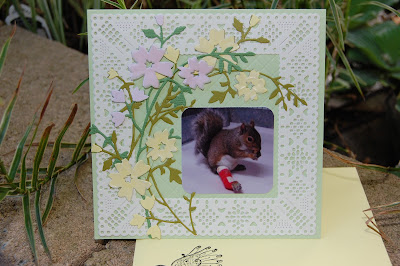
I will stay in sequence with the video, so here is the first card which features the honey blossoms and my sweet boy Tubby. If you go back on my blog to March and April last year you will find his story, and every word is true. I never add or embellish my wildlife rehabilitation stories, I don't need to. The animals live and tell these stories, I merely write them down...
 The honey blossoms die is very, very pretty and versatile. Since I chose a white frame I wanted to keep the blossoms also in light pastels. Wax paper makes for a very inexpensive yet pretty overlay and adds a whispiness to the blossoms that makes you almost smell their light scent. Try it with dainty blossoms, but only glue it down in the center, I'm sure you'll like the effect. - I took these pictures at our little pond out back and had to look at the date: this release was done last September, in case you're wondering about the plants around the cards... Of course Darlene plans her releases around the seasons, which makes complete sense.
  Next is what Darlene thought looks like clover. Hmm, I hadn't thought of that, now I wish I had! But here I wanted to show what can be done with this die, which cuts out a negative. Unlike Darlene I am not a huge fan of negative dies, but given the right treatment they really do add a lot. Darlene got it right, I did cut around the negative to get the outline and on the yellow blossom in front I ran the die through twice, once in the green and once in a light yellow, then again cut out the outline and pieced the yellow in. I like the effect on the finished card.
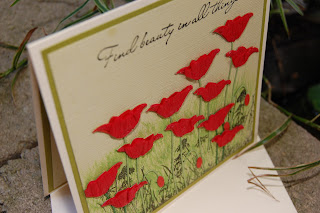
  The Prim Poppies were fun to work with. But I like dimension, I think you know that by now about me, so I went searching in my craft area for the crepe paper rolls I had picked up at a dollar store. I looped about 7 or 8 layers together and cut them out with the die, then trimmed just the blossom part and glued that onto the existing poppy blossom. A few tiny drops of glue hold the layers in place. I hand painted and stamped the background to create the meadow. This card was very easy and fun to make.
You can see the handmade envelope that went with the card. I like to coordinate the envelopes, but most of the cards that I sell in my Etsy store come with a small squirrel stamped in the lower left front corner. Of course, if someone doesn't want that, I'll make a plain envelope!
 The cherry blossoms were fun to work with. These are fairly large blossoms, which is why I chose to make the placque instead a regular size card. When I make cards I make other, smaller blossoms, check my store and take a look, I have at least one card up that shows cherry blossoms. These here from Cheery Lynn are very showy and dimensional, so special treatment was in order. I sprayed the finished placque with a preservative so that the flowers won't wilt in humid weather. - Quite often less is more, in this case all I needed was a branch of cherry blossoms and a butterfly...
And then there was the surprise box...
I hail from Germany, so of course I know a little bit about Holland, or the Netherlands, as it is called here in the States. So sending me tulips had me thinking of Holland, of course, and the endless seas of tulip beds in the spring. The box kind of came about as I went along building this piece, and in case you're wondering what took the longest time to make: it was the tulip bed to the right of the windmill. Wish I'd had at least five of these dies to cut several blossoms at once, not one at a time...
The windmill also "came about" as I played around with little sticks. I ended up gluing the blades like ladders, and at the time I didn't have the great glue I use now which grabs hold rapidly and glues securely. So this was a game of patience, but eventually I had the four blades. The body of the windmill is cardboard overlaid with balsa wood chips you can buy in a baggie at Michaels. I added color with distress ink to bring out the wood work a bit more.
That Cheery Lynn Enchanted Forest border die is GORGEOUS! Wish they'd change the picture of that die, because it does not do the die any favors. I stayed away from it for a long time because of that awful picture, but someone convinced me it's a pretty die, and I'm so glad I believed it! Very dainty and crisp, there are several dies in the set for different size cards. I highly recommend that die, don't let that ugly picture deter you.
The inner circle on the front cover is part of the Cheery Lynn border die on my first card, and both pieces cut out together but stay separate. I just put a smaller piece of paper on the die to cut out only the center piece.
I'm sure that Petra, our Dutch design team member, will get a kick out of my windmill.
If you need numbers to the dies I used, please do not hesitate to contact me or Darlene. It's late, and I wanted to get this blog up quickly.
I hope you enjoyed this release and welcome any and all comments!!! Thank you for watching and reading, and happy crafting!
Sigi


No comments:
Post a Comment