
It's been a while since any of my creations have been published, but the wait is over and I can show you what I came up with when I was presented with the Marianne Craftables dies CR1228, CR1229, and CR1230

This is a folding triangular card, and I hand inked with a pen around the cutouts in the back. The heart stems are hand cut and hold the little hearts that get cut out when you run the die through the machine. The mechanism to make the image stand is my own design.


Here I used the same die, yet it looks quite different, doesn't it? This time I adhered the images onto a Spellbinders heart die cut which I hand colored around the embossing to match the hearts. I then filled the little heart basket with my handmade flowers and added a pretty ribbon so the greeting can be hung up if so desired. On the back of the card I added "Happy Mother's Day". However, this could be a birthday card, a graduation card, a Welcome Baby card (add baby toys instead of flowers) -- in short, anything you want. This isn't a die you see coming and going, I love that.
 Here is "Eline's X-mas Star, but it is also called Ice Crystal. Weeeell, we've been through quite a long and depressing winter and I just could not get myself to make a Christmas card right now. To me, this die also looked a bit nautical, and so I laid it on top of a stylized ship's steering wheel. I made the flower in the center which is quite sturdy to hold up to packing, and I used distress ink to give the spokes a little color. The corners are again pieces of the star.

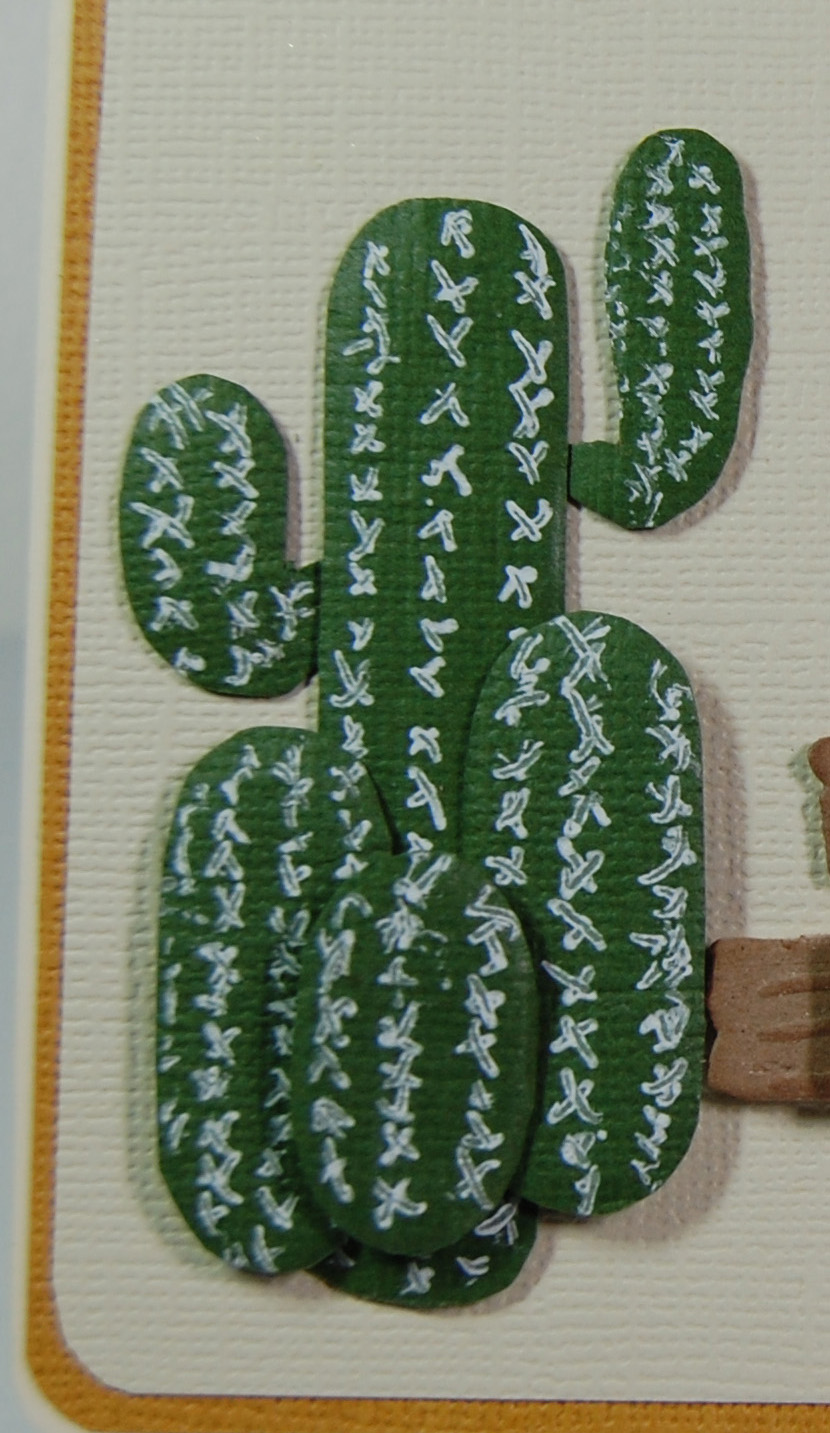
And here is my final card. The die is called Eline's Wooden Tree, but my husband said "looks like one of those road signs you see all over out west." I ran with this idea. Didn't want to overcrowd the post, so I settled for East and West Coast. To represent the differences I decided to use Maple leaves for Boston and a cactus for the desert areas around San Francisco. There is no such thing as a cactus die as far as I know, nor do you need one. I hopped online to see which cactus I wanted to recreate and decided on this one. A tutorial on how to make a cactus will follow.
As for this release, I hope you had as much fun watching, reading, and looking at the pictures as I had working it. And as always, I invite and welcome any and all feedback!
Happy Crafting, and for all you non-crafters, Happy Spring!
Sigi
Cactus Tutorial
Materials needed:
Green card stock
Shaping tool (rounded end of a bone folder will do in a pinch)
Chipboard or cardboard from cereal boxes or packing material
Scissors
Glue
White ink permanent marker with fine tip. (Michaels, Staples)
1. Cut out strips of card stock app. 1" in width and about 3-4" long. Round the edges free hand. Using the shaping tool, work the wrong side of the strips until the paper looks hollow. You want a shape that drapes over the chipboard backing, so work the paper until you get the desired shape.
2. Cut out strips of chip board or whatever card board you have about 1/8" less in width and round ends the same as the green card stock. All total you need about 3 strips of thin chipboard for each piece, each strip a hair more narrow than the previous one. Glue strips together.
Look at the image and make a total of three short pieces and one long one.
4. Again, look at the image and cut out shapes similar to the ones I have on the top sides of the cactus. Build up the same way as the other pieces except for the little "handle" pointing to the body of the cactus. Make sure that the green card stock is smoothed nicely over the edges to give the pieces a rounded and dimensional appearances. Take your time doing so.
5. With white pen, paint a cross-stitch design in lines up and down the body and other pieces of the cactus.
6. Glue finished pieces onto body of cactus, slightly offsetting each piece to keep the cactus from looking too symmetrical. The two top pieces are glued so the little handles tuck under the main body a bit.
Voila, a cactus! Now, whatever you do with it is up to you!...
Hi Sigi,
ReplyDeleteWauw girl what a great release, i just love all of your creations, and thanks for the tutorial!!
Hugs, your Dutchie. xxx
great cards specially the 1st one and thanks for the tutorial
ReplyDeletebibiana