Followers

Tuesday, February 12, 2013

Some creations since late fall

I will show just a few standouts I've been working on:

This was a special order wedding anniversary card:  the husband had built two Adirondack chairs from reclaimed wood and wanted a special card.  I couldn't think of a better way but to build an Adirondack chair from card stock and give the card a garden flair.  This is a one-of-a-kind card, but that is what I do:  If I can figure out a way to make it, I will build a custom card for you.


This is a large, 15 x 12" shadow box, a one-of-a-kind piece.  Except for the shadow box itself, everything you see on this picture is hand made with card stock.  Yes, even the basket is hand woven from card stock and distressed with ink to resemble the real thing.  The flowers are hand made, colored, and shaped one petal at a time.  This is a "Wow!" piece perfect as that special gift you can't find anywhere else but here. 


 Here is another shadow box, again completely made from scratch/card board.  A different looking basket this time, making a box like this takes up to a week to create.  Go ahead and zoom in and look closely at the blossoms!  If I don't like how they look they do not get to grace a bouquet.  Another one-of-a-kind piece, this one is slightly smaller than the above shadow box but no less "Wow!"

Another 15 x 12" box, and different flowers again.  My Dutchpapercrafts design team members have discovered my flowers and have started to buy them from me.  That is as high an honor and testimonial as to their quality as I can get since many of my team members have been doing this for at least 20 years.  I'm the newbie, but I've come a long way in a very short time.  This is yet another one-of-a-kind piece.  I don't like repetition, I like to create fresh and let my imagination take over.  Take a close look at those delicate and pretty blue flowers!  Do I have to repeat that this is also a one-of-a-kind shadow box? 
 

Time flies!

Bonnie kicked my butt for not posting anything on my blog for so long.

Sorry about that.  It's just that sooo much has been going on, and not all has been pleasant.

I haven't been able to release of all my 2012 wildlife before the weather turned, mainly because my cages were backed up and the weather too inconsistent.  So an opossum is spending the winter in my rehab room and a cottontail is still in the oversized outdoor hutch.  Heck, why not?, he has it made with a thick layer of hay, a warm nest box, food galore, and protection from the elements.  He is completely wild and will be released this spring, I just didn't have the heart to toss him out in the  sudden snow last November, and when I tried to release him the first time in October he refused to leave the cage... 

As a recap of 2012, when I did my total accounting for the Dept. of Fish and Wildlife the number was staggering:  I had taken in 97 animals during the year.  Not all made it, but the majority did.  All were given the best possible care, and those who died passed away peacefully and relatively pain free.  Sometimes that is all a wildlife rehabilitator can do, make them comfortable with pain medication and warmth and allow them to slip away calmly and quietly. 

2011 was my year of the raccoons, and 2012 was my first year taking in skunks until their release.  I wasn't sure if I could do that simply because usually skunks are kept well away from other wildlife and in outdoor pens far away from human activity and pets.   I could do neither:  our property is a measely 0.13 acres with often obnoxiciously noisy next door neighbors, and I only have one tiny rehab room which is in the basement.  Above is the kitchen with tile floor, and when the dogs play with toys the clunking can get quite loud in the rehab room. 

Baby skunks are in the top five in terms of cute appearance, but they can have a temper.  My adventure started with Stinker, a little boy who was brought by a young couple who had already fallen madly in love with him.   He was quite articulate and let me know that he wasn't happy in his initial home, a large carrier, he wanted out and interact with me.  Eventually he settled down in his new abode which I kept in the living room area for close observation.  Three days after Stinker's arrival I received a call about a very lethargic baby skunk that had been found baking in the hot sun in the middle of a lawn.  The little girl was covered with fleas and quite dehydrated but seemed fine otherwise.  It took a while to get rid of all the fleas and administer subcutaneous fluids to give her a head start, but eventually she was stable enough to be introduced to Stinker.  I thought he'd be elated to get company of his own kind, a play mate, yaaaaaay!  Not so...  Stinker had a hissy fit, and when skunks get really, REALLY upset it also gets really, REALLY smelly.  "Open the door!!!" I yelled at my husband as I grabbed the carrier and hurried it outside.  Stinker wasn't aiming at anybody in particular, he was just letting go indiscriminately while screaming in the little girl's face to get out of his house.  She just stood there, dazed, but eventually grew annoyed by his fit and suddenly screamed back.  That unexpected retaliation took Stinker by surprise and he did shut up indeed.  I was outside the entire time, filming away, trying to stay out of the aim of the swollen anal area whenever Stinke's behind was turning my way, but I never once got sprayed.  Eventually Stinker was exhausted and quieted down, and that gave the girl a chance to take a few bites of food.  An hour later the two were sleeping together, and yet another hour later they started to play with each other.  They remained in the living room until they had grown big enough to warrant a larger cage in the rehab room.

Once I had been "primed", another call came in:  five orphaned skunk babies needed help.  The woman told me that a neighbor had called Pest Control to remove a skunk that wandered onto his property at night, and Pest Control killed her without first checking if she was nursing young.  When the man returned to dispatch the youngsters the woman stood up to him and told him that the babies were on her property and he was trespassing and better get lost.  Then she called me. 

It took a total of 10 days to trap every last skunk youngster.  They were not in good shape, with mangy looking fur, dirty, and pretty skinny, but they perked up quickly.  They never grew tame, always ran for cover when they saw a glimpse of me, but never went on the offensive either.  When they were sound asleep I got a glimpse into the world of skunks, and I loved every moment of it.  Young skunks are in many ways similar to kittens, inquisitive, curious, and playful.  The main difference is their powerhouse on-board weaponry which is fully functioning at birth.  Babies are not able to control this rear missile so "baby farts" are common but not unpleasant.  These little farts do not contain the noxious oily fluid that sends any predator packing immediately. 

Stinker, left, and Stinkie.  I could easily tell the two apart by their different blazes.  Skunks differ greatly in markings, from nearly all white to nearly all black. 


Inquisitive younster explores brand new litter box. Her fur is still ratty looking from malnutrition

The opossum lived right next to the five skunk youngsters.  Both are nocturnal.


Much to my surprise, the skunks all settled in nicely in the rehab room despite the noise of other animals very close by.  I never smelled anything and they never sprayed when I entered the room, they just ran for cover.  The one time I did get sprayed was an accident.  I was cleaning out their litter box which required both hands, and they were horsing around.  I had left the cage door open since it only took a minute to dump and clean out the litter box, and one of the youngsters accidentally got pushed out the door.  He frantically hung on with one hind leg and I tried to grab him before he hit the floor nose first, but I could only grab the tail as he fell.  In a panic, although not hurt, he let go, and the ricochet spray hit me.  I grabbed him and put him back in the cage, then ran for my supplies to mix the skunk odor removal recipe.  Half an hour later I was showered, my clothes had been dunked in the solution, and I had wiped down all surfaces in the rehab room that had been sprayed.  By morning the smell was quite faint and non-detectable two days later. 
 
Here is the recipe since I know there will be people asking about it. 
 
1 quart Hydrogen Peroxide
1/4 cup Baking Soda
1 tsn dish detergent (I like Dawn since it cuts grease so well,and skunk spray is very oily)
 
Mix all ingredients in an open container and use immediately.  Avoid eye contact.  Throw away any unused portions.  This mixture is volatile, never put in a closed container or bottle!  Note:  Hydrogen Peroxide bleaches, so do not leave on long.  I poured it in my hair, worked it in, then immediately rinsed it out.  The clothes I merely dunked in, the smell was gone on contact.
 
The five skunks went in the outside cage first for acclimating, and despite rowdy neighbors they remained calm and did not spray.  I released them two weeks later into a wildlife management area late at night and watched them slowly wander off into the dark.  By then their fur was thick and smooth and they were beautiful.  I had given them the best start in life I possibly could, and it had paid off.  They were healthy and strong. 
 
Stinker and Stinkie went in the outside cage next and were released at the same spot two weeks following their stay outdoors.  This was the tougher release since both had been so friendly with me.  I drove by the area again two nights later hoping I wouldn't see any dead skunks alongside the highway, and gladly, I didn't.  I checked the release area and called out and nobody came.  Despite their friendliness, this had been a good release and I felt a lot better after that. 
 
I will always take skunks despite the high cost of raising them.  One skunk cost me about $150 to raise, so these seven were over $1,000.  Donations received for them had actually been very generous:  Stinker came with a lot of supplies such as paper bedding, pine bedding, rabbit food, and other supplies, all broken bags that could not be sold in retail, the woman had collected at the place she works.  Stinkie came with $20, and the five came with a total of $250, the largest donation I've ever received for a litter of babies.  Without the supplies the cost would have been higher still.
 
--
 
People who bring animals generally don't think nor expect to be asked about a donation.  Whenever possible I ask them on the phone already, and there have been times when I simply could not take on yet another animal that would arrive without a single cent.  I have determined that the absolutely low end of raising wildlife, when I average it out over the total number of animals taken in, comes to $65 per animal but is potentially much higher than that.  We never factor in the endless hours and 24 hour days when we get a critically ill animal in, time is voluntary.  I say "we" because no wildlife rehabilitator worth their salt will charge for their time.  Many rehabbers manage to get volunteers to help out with cage cleanings and transportation of sick wildlife, even fund raising to help keep them above water.  For some reason I have not been lucky in that area:  I have to do it all myself.  And it is a killer.  Every year more and more birds arrive, I am the "catch-all" in my area since the nearest bird rehabber is 50 miles away and most people refuse to travel that far.  Raising both birds and mammals simultaneously is physically extremely taxing and exhausting since birds must be fed and then cleaned every 15-30 minutes from sun-up til past sun-down whereas neonate squirrels need feeding every three hours around the clock.  Sleep becomes virtually non-existent, and eventually I crash.  Every year I promise myself I will NOT take any more birds, but many people don't even call anymore, they simply show up at my door with the little thing looking at me helplessly...  Birds cost a fortune to raise since they devour live insects and worms which we have to buy online by the tens of thousands and then have to pay for overnight shipping since otherwise there is no live arrival guarantee.  I kept track of the worms I fed to a clutch of five tiny Carolina wrens one day and was shocked:  those little 1-inch bouncy-balls devoured a total of 1,052 mealworms in one day alone.  At Petco, where mealworms are sold in containers of 50 or 100, that would have been about $70 for one day.  Online prices are a little less than half, but still, the cost is prohibitive.  I have a HUGE respect for bird parents who tirelessly hunt insects for their hungry brood all day long. 
 
--
 
Maybe now you understand why I try to sell my beautiful paper crafts:  it is to help offset the enormous difference between actual cost and donations I receive to raise the wildlife in my care.  If I am lucky I manage to get about 1/4 in donation and have to somehow scrape together the remaining 75% out of our own pockets.  Is it a wonder that we have no money for heating oil? 
 
I've been told by a Clark University professor who helps people achieve non-profit status that I should lower the quality of my crafts in order to push out more quantity.  That did not sit well with me at all.  I pride myself with the quality of my items, shortcuts or so-called "five minute" items are not on the menu.  I believe in my craft and that, as word goes out, people come to appreciate the uniqueness of my creations in that there isn't anybody else who makes anything similar to what I create. 
 
With that being said,  it's off to showing you some of the items I've been working on.  See the following post for that!


Monday, October 22, 2012

New Fall greeting card designs

I've been busy during my "free" time which is usually late at night after I am finally done with all the animals but it's too late to vacuum or do other house work.  These are so far all wildlife rehabilitation based cards, which means that each animal was cared for by me until it was old enough and capable to be successfully released into the wild.  When it comes to cards, people seem to prefer the flatter type if they need to mail the card, so I have tried to accommodate that. 

Again, these cards are completely made by hand.  The backgrounds are embossed and hand colored, the embellishments are handmade (I never use store bought embellishments!), and the designs are uniquely "Sigi's creations".  I have omitted inside greetings this time to allow you to write your personal greetings.  Your feedback is welcome!!!

The cards, which come with a handmade envelope, are priced at $5.95 each.  Again, your purchase helps me help wildlife!

Here is my litte flying squirrel baby boy who arrived with a broken wrist when he was only about 7 days old, and he is sleeping under a maple tree. 


Two squirrel youngsters peak out of a nestbox.  Oak leaves and other fall grasses decorate the corner of tne nest box. 


 Tornado, the now fairly famous surviving squirrel from the 2011 tornado that devastated the Sturbridge/Monson/Springfield area, eating an almond.


 And then of course there is Tubby, my Logo squirrel, whom I had gotten as a baby, raised, released, and who returned with a broken leg for help, was treated at Tufts, healed, was re-released, and then bode me a very emotional farewell.  Tubby will always have a special place in my heart.  You can read his entire story on this blog

Shadow boxes

Working on new designs for fall and soon Christmas, I wanted to make something more dimensional.  The end result are two shadow boxes of which I am quite proud.  Both feature basically the same theme, but one is a maple tree, the other an oak tree. 

The design came about after my friend Troy, a tree cutter by trade, came to our house last week with his monster bucket truck to hang seven squirrel nest boxes in the trees surrounding our property.  Troy and my husband had built a total of 14 squirrel nest boxes together a few weeks earlier, so our squirrels get to enjoy luxury housing with poly fill already inside this winter.  The city of Gardner is good at cutting trees but falls flat on their faces when it comes to replacing ANY trees, and the result is an ever decreasing natural homestead for wildlife of all kinds.  Birds need trees just as much as squirrels do, and we humans need them as well, for oxygen, among other things... 

But back to my shadow boxes.  Both are completely made from scratch, with just a few punches, scissors, an embossing pad, distress inks, glue, a picture, and lots of imagination.  I am having my husband bring one to work to display on his book shelf in hopes that maybe some co workers visit my blog and leave honest comments about the shadow box.  Pictures never do justice to three-dimensional items. 

Again, my items are for sale to help offset the ridiculous cost of wildlife rehabilitation.  I haven't added up all animals I've taken in this year, but the total will easily run 90 or so.  I will be overwintering a flying squirrel and a red squirrel plus two birds I could not release in time for migration, but I am nowhere done for the year otherwise:  I still have 10 squirrels in outside cages, four more went to Troy into his outdoor cage for release there so I don't overpopulate my area, and I am holding three doves and a robin in my flight cage until I can solve the cat problem in our yard.  A cat, a repeat offender which I have chased out countless times already, killed one of my young doves released earlier a few days ago, and I am now on the war path to make our property safe to release my wildlife. 

 This is the first shadow box I made.  The maple leaves are a Martha Stewart medium punch and are then hand colored with distress inks and shaped.  The nest box is completely made by hand with just an embossing folder used for texture and distress inks.  The squirrels are two of hundreds that I have raised or rehabilitated over the years.  The mums are clusters of individual blossoms made by hand.  The box is very dimensional with branches reaching out to the front, but that is hard to see in a two-dimensional picture. 

The price for this box is only $39.95


Here is the second box, even more dimensional than the first one.  I added layers of chipboard to give the nest box thickness and make it stand out more, and I sculpted the tree trunk and branches into more dimensional shapes.  The oak leaves are punched out with a Marvy Uchida punch and hand colored and shaped as the maple leaves. 

The price for this box is $45.95 

Note that the price for the shadow box alone is $10, and it took well over 12 hours to make each box.  I use only high quality cardstock. 

Each box is a one-of-a-kind item, since even if I make another one it won't look the same as these.   

My first ever Halloween card!

Our Dutchpapercraft design team had this idea that we should do a Halloween swap: either stuff an envelope with materials related to Halloween, or make a Halloween card.  Swap with another member of the team. 

Now, Halloween is not something I do much with except hand out candies galore when the kids come around.  So my chin nearly hit the top of my craft table when I saw this.  There was a choice to opt out, but  I didn't want to be a party pooper either.  I have orange and purple and black paper, but not gory colors, mostly only colors I use for flower making.  I had a set of Spellbinders bats.  What else?  Money was tight as usual, feeding 30 wildlife plus pets is expensive, so going out to the craft store and purchase a bunch of stuff I don't really care for in the first place was not a choice either.  And then there was sooo much to do with the animals, would I even find the time to think of something? 

A day or so later I remembered that I might have bought a Halloween Cricut cartridge dirt cheap last year, did I?, and I went searching in my storage bag.  Yes, there it was, so I was "in". 

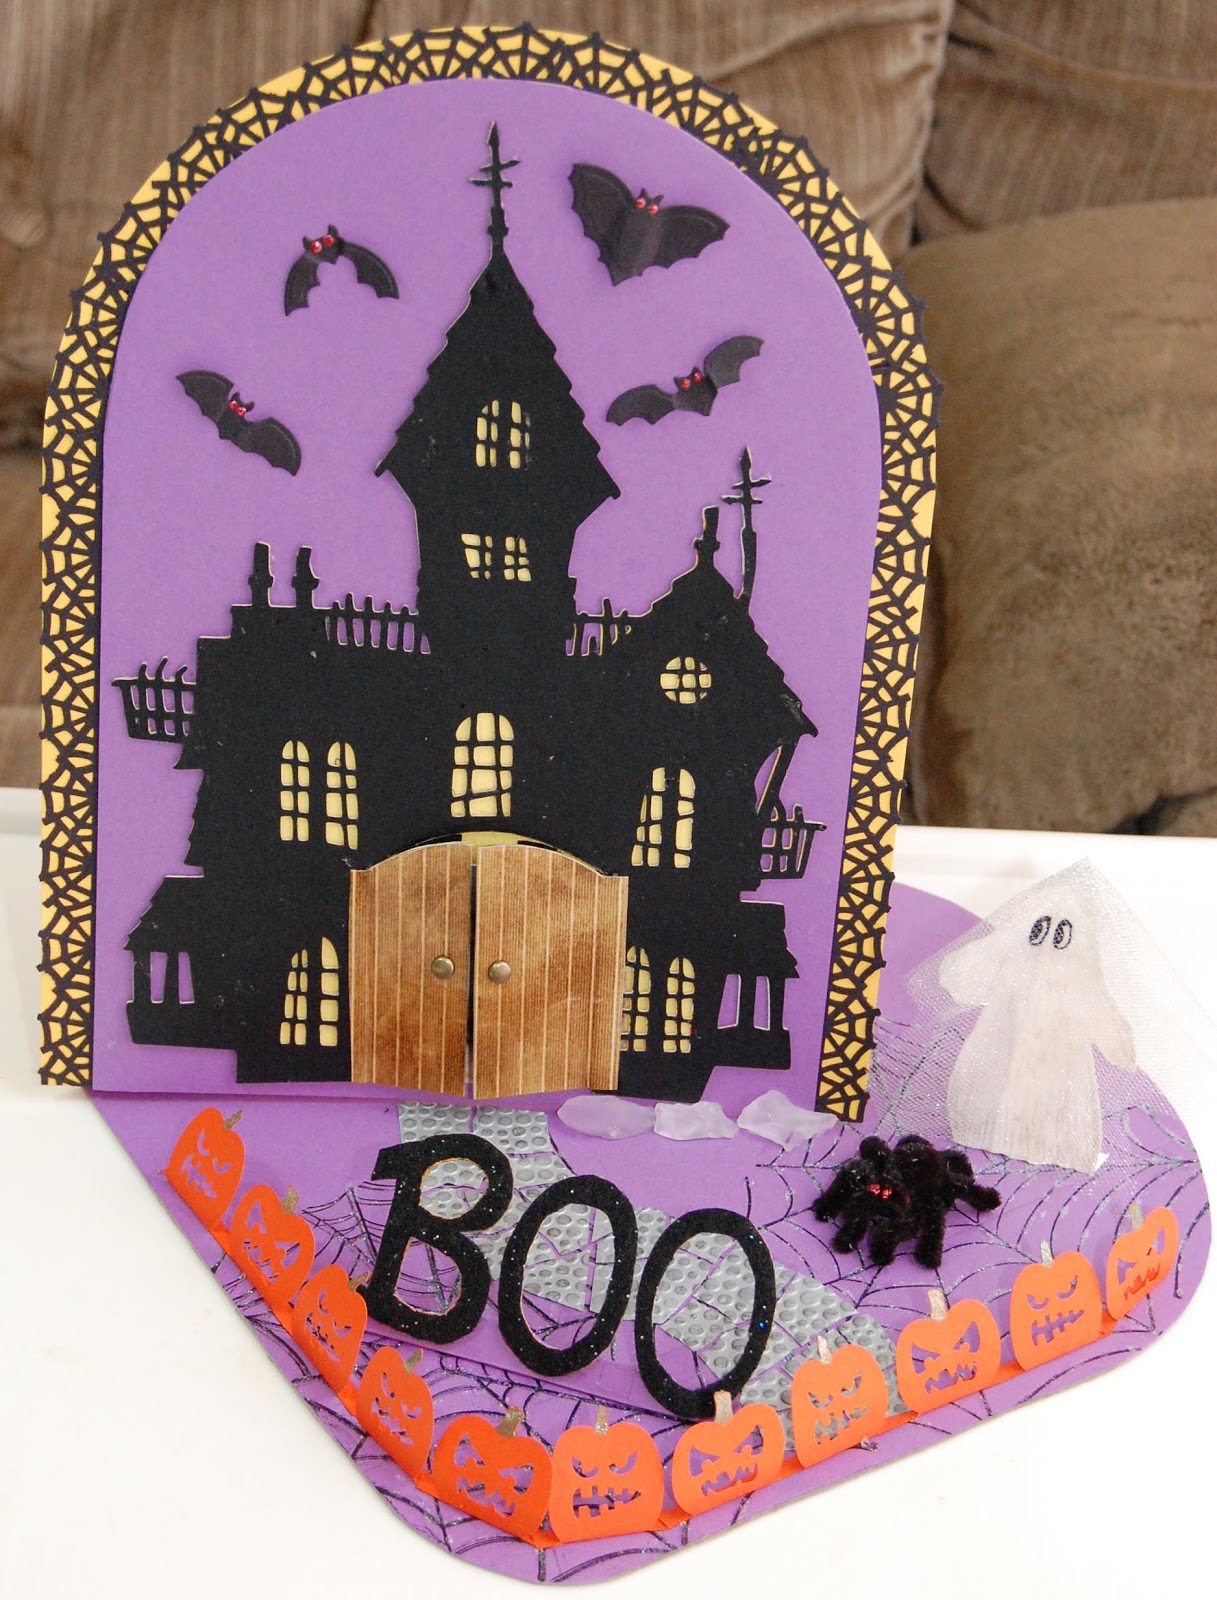
Anyway, I made one card, and it came out so cute that I decided to make an even larger one which is currently my husband's Halloween desk display at work.  But before I handed it to him I took some pictures. 

The card is a twist-up design, and I got the idea from a YouTube video which featured a round card.  Why not adapt it to a rectangular card?  As you can see, it worked like a charm, but I had to reinforce the card stock in the back since the card is quite hefty. 

 This is the closed card.  I cut out the house from the Cricut Happy Halloween cartridge.  The bats are Spellbinders, the door is my own addition.  I used a Cheery Lynn Wittle Wicker die to emboss the pattern, Tim Holtz distress inks to color the door, and added a clear glaze and brads as door nobs. 


The opened card.  Oh, I forgot, the rim is a Martha Stewart border punch "spider webs", the pumpkins are also a MS border punch I got on clearance, the BOO is cut out by hand, the spider and ghost are hand made.  The spider is made from pom poms and pipe cleaners, the ghost is card stock and veil material.  I glitter glued spider webs all over the floor and added the cobble stone path. 


 And here is what hides behind the door:  one of my many baby red squirrels drinking formula... 

Anybody can cry BOO! and put something icky behind that door, but not everybody has baby squirrels to take pictures of...  So there!... 

Happy Halloween!!!

Cheery Lynn Fall and Halloween 2012 release

22 October 2012

Yesterday Darlene of Dutchpapercrafts released my latest design challenge, a beautiful die bundle from Cheery Lynn with which I had a lot of fun.  So I want to start with that and give explanations to the different cards and items I created.  It's been a while since I had time to add to my blog, but I PROMISE that I will.  Not just crafts, after all, I rehabilitate wildlife, and it has been an incredibly busy year with lots and lots and lots to write about, so please stay tuned!

Anyway, back to the design challenge.   Here is a link to Darlene's video:  http://dutchpapercrafts.blogspot.com/2012/10/cheery-lynn-and-lifestyle-crafts.html
You can also view it on YouTube, just search for dutchpapercrafts.


This is the first card Darlene presented, and the challenge was to use the Cheery Lynn honeycomb die.  Since I messed around so much with all the other dies I decided to make a simple card for a change, simple and homing in on fall colors.  The background consists of several layers of deep orange, deep green, and lighter yellow Bazill cardstock, the leaves are punched out from leftover fall color patterned cardstock.  Heck, sometimes I like to go a little abstract!


This is the Japanese Wall Hanging die from Cheery Lynn.  I was thrilled when I saw that die since I knew exactly what I could create with it.  I lived in Japan for three years and loved, loved, loved it there!  So here is my rendition of a Japanese room... 

Here is the folded card, held shut with a little velcro tab hidden underneath a handmade flower...
... and here is the open card, illuminated from behind to show off the "rice paper" panels (I used wax paper to create the effect).  For the side panels I cut the die in half and used only half of it on each side.  The center panel is inlay work:  I cut the die several times with the colors shown and then used the pieces to create the color pattern.  The Kanji stamp is gold embossed, the little cranes are classic Origami, and I chose a white lantern since red lanterns are often used to illuminate the streets where Japanese men can seek companionship.  I used chop sticks to mimic the floor of the room.  The walls are covered with fabric inside and out. 
If you would like to know how I made the lantern, please email me and I'll be happy to post instructions. 

This was another fun die to use, the Cheery Lynn chain link fence.  I chose a silvery cardstock for the die which normally would cover most of the card front, but I wanted only sections of it.  The background is layered, the background grass stamp on the left is from Hero Arts, and the grass dies are from Marianne.  The chipmunk was one of my countless "house guests" who hogged the food bowl upon release and stuffed his pockets with goodies until nothing else could fit anymore.  He was quite wild but let me come fairly close with the camera since he knew I was no threat.  -  The flowers are fall asters, and yes, they are quilled after being cut with a fringe die.  I have several from Quilled Creations and from Memory Box, and the leaves are I believe also a Cheery Lynn die plus punched out shapes from my stash.  The card is matted off-centered to add a bit of interest. 

And here is the card I am most proud of, because I incorporated sooo many different techniques, and the stone work may be my very own invention to boot.  This is NOT a card that is done in a few hours, but the end result is, at least in my opinion, nothing short of stunning. 
 I started off with medium weight chip board and cut out the shape of the Gothic cathedral.  Then I used a Spellbinders die to cut out the round hole that would correspond to the size of the window die but just a tad smaller to allow for glueing on the window.  Then I used a stiff flat brush to paint on the medium, which I found at Home Depot in the paint section.  It is from Martha Stewart and is called Terra Cotta Specialty Finish.  The container holds 10 fl oz.   The stuff reminds me of Spackle with a very fine grid sandy texture, and it is an off white color. In fact, when I wanted to get another container they didn't have any in stock so I brought home a small container of Spackle which I  will try next time.  -  Painting on the stone work was painstaking work, and then I had to let it dry.  So I made several panels, and by the time I had a few done the first one was dry.  -  To get the stone effect I chose Tim Holtz alcohol inks, Slate.  Full strength, it evaporates in no time but creates some interesting hues, while when diluted with water a bit it lasts longer but gives a lighter effect.  It also takes longer to dry.  I went over the piece several times, brushing very quickly to not add too much color, and the mottled effect reminds me of the old sandstone cathedrals we have all over Europe. 

 I cut out the stained glass window from thick card stock that has a slight silvery shimmer and glued that on clear acetate (a.k.a. clear slides material for projectors).  Then I trimmed around the die.  As for the stained glass effect, again I used Tim Holtz alcohol inks which I mixed into Judikin glaze until I was satisfied with the stain. I laid the die face down and painted the colored glaze onto the sections as shown, letting the colors dry before proceeding to the next to prevent bleeding.  Again, I made several windows at once.  No sense wasting inks and glaze, that stuff is not cheap.  By the way, Aleene's clear glaze would also work.  FYI, I tried different type markers and inks without the glaze, and it doesn't work.  -  When the glaze was thoroughly dry, I glued the window onto the outside of the card.  Next, I glued wax paper onto the window from the INSIDE and overlapping onto the cardstock to add stability and also to give the inks a deeper color.  Leaving it clear made for too subtle colors for me, the wax paper enhanced the colors dramatically.  I glued the wax paper carefully and added fine lines of glue only along the lines of the die. -  Next, I added the wings with white cardstock and then proceeded to cover the inside of the card with white cardstock as well.  Needless to say, I had cut out the corresponding holes prior to assembly to make the whole thing fit.  Lastly, I cut out the cathedral window again, this time with white cardstock, and added that on the inside of the card to give the window a finished look.  I did the same with the smaller center pieces on the wings.  Added the sentiment, and then the vine, a mega flourish die from Cheery Lynn. 

This is how the card looks when illuminated by either a lamp or a candle. 
And here is the card as it looks without backlight illumination. 

I chose a year round sentiment, but this card could easily be made into a Christmas card.  I just felt that a recipient might want to keep it out year round since it looks so pretty when illuminated!


 Next is the Cheery Lynn Mexican Tile pattern.  This die cried out for inlay work, at least to me.  I chose the terra cotta color pattern which also happens to correspond with fall.  This die cuts out two separate pieces, the center piece can be added or left out, depending on your personal taste.  I cut out the die in all the different colors featured here, and piercing out the tiny holes that run through takes a little patience since they don't always fall out readily.  I kept all the tiny pieces and then sat down and started gluing in the inlay.  The diamonds are not all identical, the center ones are smaller than the outer die part and all are off centered and need to be fit accordingly, so yes, this type of card requires patience.  But isn't the end result stunning?  I had so much fun with it!!!  I then added the ribbon after punching out the slots with an EK Success heavy duty punch (Michaels, 40% off coupon, but oh so worth it over their own brand, that punch goes through several layers like butter). 

On the inside of the card I continued with the color scheme and added a zig zag border (EK Success border punch).  Since I don't own any Spanish stamps I had to look up the "how are you?" greeting and them added it by hand.  Not perfect, but I didn't want to do a computer printout either. 


And then there was this Cheery Lynn Pinwheel die.  At first I had no idea what I would do with that, so I set it aside for last, or until I would have an "epiphany".  And golly, did I ever, grin...

At first I decided to make a Halloween card, and Halloween colors are of course black and orange and other gory colors.  So here is my rendition of a Halloween card which incorporates all those colors!  The pinwheel spins, the bats are Spellbinders nestabilities enhanced with Sakura gel pens and Stickles eyes.
But I had already messed around with the pinwheel which comes with an angel wing (the half die which is used on folded cardstock with the non-cut side of the die aligned to the folded side of the cardstock so you can unfold it and have the whole shape) and kept looking at it and wondering what else I could do with that.

Well, THAT.  It is a Halloween ornament, and it is super easy to make.  I cut out the pinwheel eight times and glued it onto both sides of four angel wings.  That gave me four double sided pin wheels.  Next, I used my heavy duty paper trimmer (rotary blade) and cut each pinwheel exactly in half.  (Don't try this with a flimsy Fiskars trimmer, the triangular blade will not make it through and destroy your pinwheel).  Then I took a 1/4" diameter dowel and glued each half onto the dowel, going opposites each time to make spacing easier.  I used Aleene's fast grap tacky glue but it took quite a while for the glue to securely hold each piece, so maybe hot glue is a better choice as long as you place the piece exactly immediately.  That's why I prefer regular glue, it allows me to move the piece into place which hot glue doesn't.  I then hung the ornament until the glue was completely dry and everything felt stiff and rigid.  Then I strung the beads (from my stash, no idea where they're from), added the holographic ribbon to the bottom to hide the dowel, and glued all the bling into place.  Again I used the basic Aleene's fast tack glue, in my opinion still the best glue out there...  Last, I cut off the top of the dowel and added the orange ribbon for hanging. 


This little angel just "happened".  I don't know how and why, I just suddenly "saw" that in the die pattern.  Both my husband and Darlene quibbed "how the heck did you come up with this one from that die?", and I don't really know how, it just did.  Darlene asked me to post instructions on how to make it, so here goes:


1.  Cut out two pinwheels.  You will use about 1 1/3 pinwheels for one angel.


2.  Cut out along the design seven segments as shown.  Make sure you have the same design on each side since this is where you will glue the body together, and the design needs to match.


3.  Cut a notch in the top as shown and then snip into that vertically a few times so you can bend a small rim later on.  You'll see what I mean in the next pictures once this piece is glued together. 


4.  Now, take the piece you cut off and roll the arm like this.  You will use one patterned and one solid segment for one arm.  Glue together on the rolled-in seam, then cut.


5.  Your two finished arms should look like this.


6.  Next, cut the two wings from the leftover material.  You could of course add more real looking wings, but I preferred the stylized kind to match the pattern. 


7.  When the body is glued together, the pattern should match perfectly and look like this.  Note the "collar" on the top, I added a rim to glue on the wooden head.  That's why I snipped in first, to make it easier to create the rim. 


8.  Side view of the body before head, arms, and wings are glued on. 


9.  For the hair I used a square cotton cosmetic cleansing pad, the kind you buy in a roll of about 50 or so at the drug store.  I cut it like this:  The bottom center will be the bangs. 
I suggest you use regular glue to adhere the hair so you can manipulate it into place. 


10.  The ALMOST finished angel.  I always forget to paint around the bottom squares before I glue the body together, duh, so I have to add it afterwards. 


11.  The decorated angel.  I used Sakura glitter gel pens, gold. 


12.  Back side of angel to show how I glued the wings. 

Well, hopefully this little angel inspired you to dig out your round doilies and start making angels with them!!! 


I hope you enjoyed this blog.  Please feel free to email me with any questions!  Happy crafting!


Saturday, August 25, 2012

Die-Versions Heart Release

Darlene surprised me today with the release of my last assignment.  Well, I should have been ready to publish this, I just haven't had the time to post anything.  Seven skunks, two opossums, cottontail bunnies, a host of baby birds, and already the second batch of baby squirrels keep me hopping non-stop. 

But that's another story.  Need to describe and explain my creations here, so please bear with me!

Darlene sent me these intricate dies with a comment that these would be great for a wedding theme.  I took a deep breath when I read that, I have only been to one American wedding and that was eons ago.  Hailing from Germany, my own first wedding had been very small and frugal, so I had to do some serious research. 

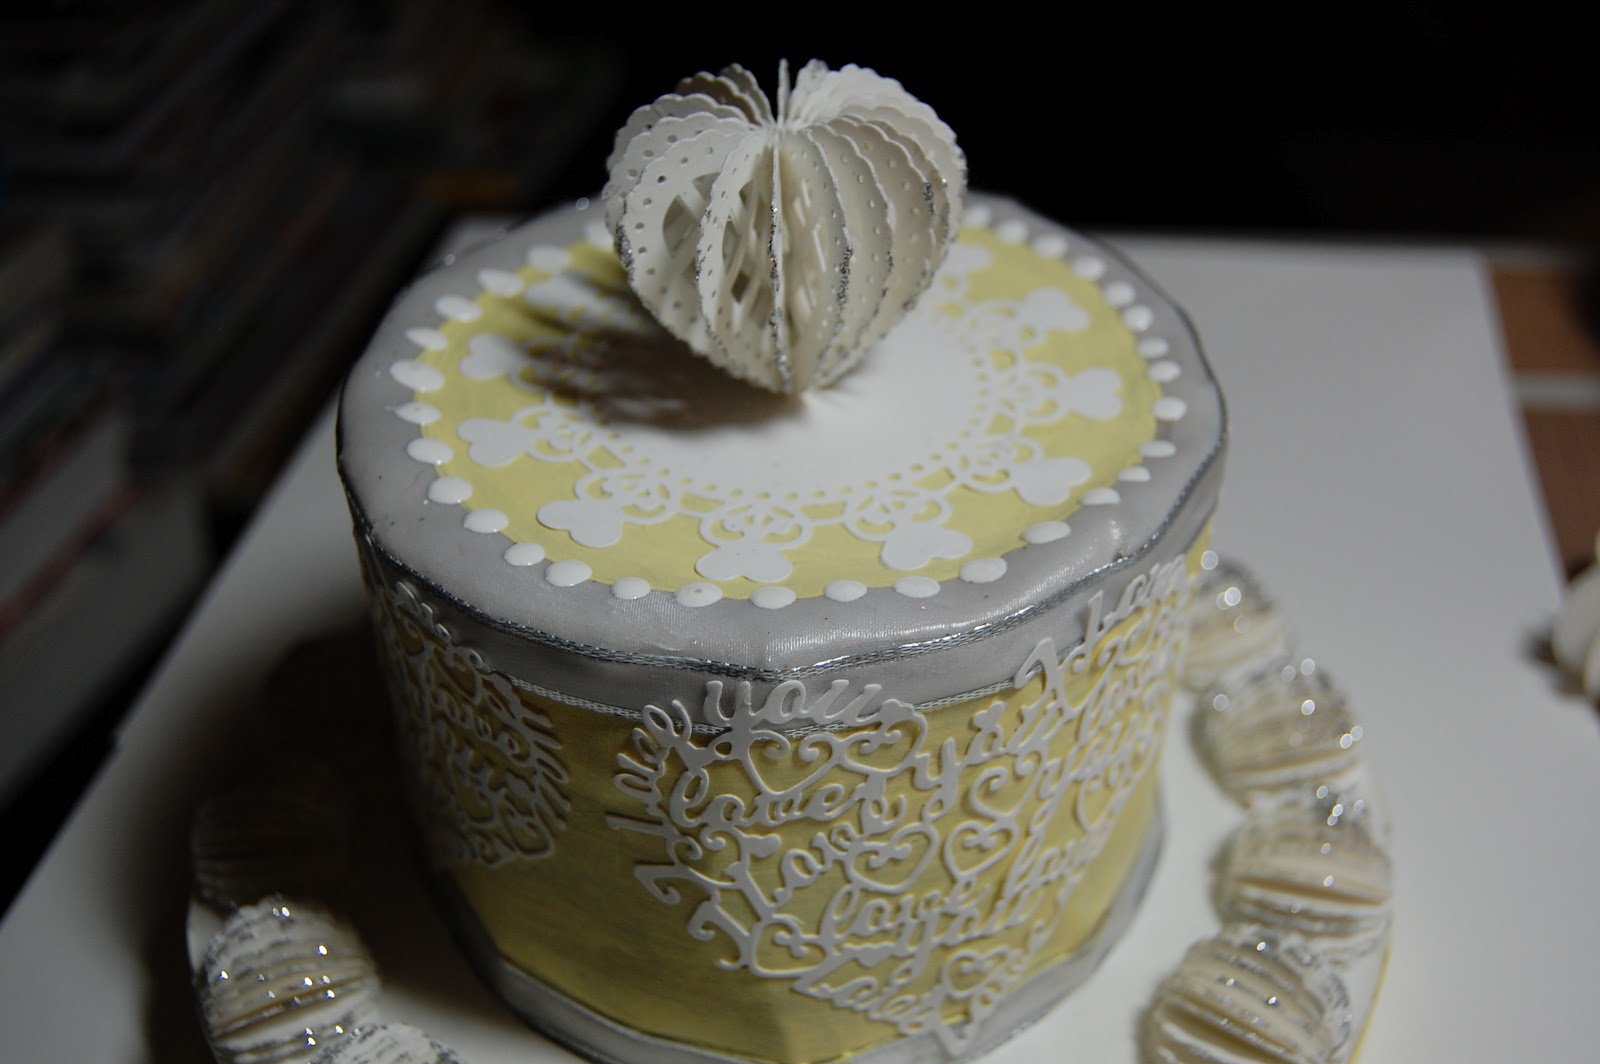
American wedding cakes can be extremely elaborate, and don't ask me why, but that was the first thing that popped in my head: make a paper wedding cake.

To make this I cut out two same size cardboard circles and one larger one for the bottom piece.  Then I cut the side walls and scrored both sides about 1/2 inch in and then cut triangles to the score line to make the cardboard bend smoothly and to use the triangles as glue attachments.  Let it all dry and then decorated the cake with white and yellow paper. Then I added four die cuts of the Love All Around die equally spaced around the sides and one DVS 4x4 110 Heartthrop circle die on top.  .Then I cheated and used Perfect Pearls as embellishments, but they are a little more runny than I had wanted...

For fairness' sake I have to state that the topper is actually a large Martha Stewart punch.  I folded each punched shape in half and then started gluing it together making sure everything lines up perfectly.  How many or how few you use is up to you, but it should end up in a nice round shape.  I than added silver glitter glue. 

The bottom of the cake has paper cream dollops which I fashioned with a circle punch and then patiently glued  together.  These have about 20 folded circles per dollop.  After glueing them in place I glitter-glued them as well.  The large half-circle shape around the bottom of the cage is a deep edger from EK Success. 


I made another wedding cake after sending this one off to Darlene, more tiers this time.  And I used scalloped circles and a different die from Die-versions but from the same set.


Next up in the video is the shower invitation.  Everything I saw in the stores was white and formal looking, so I decided to add a little fun to the whole thing. 

I made the card first and then the envelope to fit with the MS Scoring Board.  The card's border is a MS punch around the corner set, the ring set comes from a Cricut cardtridge (Sweethearts, I think), and the stamp I found on clearance at Michaels a while back.  Card and envelope are color coordinated.  To add a little interest to the envelope I first cut out the die on the flap part and then reinserted it after gluing the contrast flap color in place.  Simple to do...


I chose to be more formal for the wedding card itself.  The border punch is very similar to the one I used on the cake and is also from EK success, and I laid out the card so front and back would look the same.  Then I draped some sheer veil material over the card and adhered it along the inside of front and back flaps, made some ribbon roses, and added a simple tag using corner rounders with color coordinated stamped greeting.  I then used a darker piece  of purple cardstock and punched out the starburst pattern.  Finishing the inside hides the glue strip for the fabric and gives the card a professional feel.  


For the final die I decided to make a treat bag.  I don't have any dies to cut one out, so I winged it.  Cut a loooong strip the width of the bag and the entire length plus flap and scored it where I wanted the bag to fold.  Then I punched out the flowers with a MS Punch all over the page punch and glued light paper behind that to accentuate the punch's design.  Next, I cut two strips about 1" wide and 2/3 the height of the bag and glued those into place alongside the bag.  To get the bag to close easily I creased the upper half of the side strip.  I glued on the Die-Versions circle die and added a handmade flower and Velcro dots to open and close the bag.  Put in two little candies, done. 

I hope these explanations help.  If not, I will try to make up examples step by step and post them as well.  Right now I have to stuff a hungry Cardinal baby's beak again and go clean cages downstairs again in preparation of dinner for the wildlife soon.  And then it's already time to feed the baby squirrels again!