Followers

Wednesday, April 3, 2013

Yet another true Pop-up Carousel Card...


I am still at it, trying out different methods to utilize this card style.  Plus the new Martha Stewart circle edge punch lends itself rather nicely to this style as long as the circle is not made too small. 

This time I decided on a floral theme again, the four seasons.  Since no flowers bloom in winter I cheated a little and created Spring, Early Summer, Late Summer, and Late Fall in the four sections. 

 Here you see the card as it looks tied closed.  The only way to safely mail a card like this is in a small box, but picturing how thrilled the recipient will be should be worth that little extra trouble. 


This section, Spring, features cherry blossoms with budding leaves in the backgound.


Here is Early Summer, and I chose daisies since they start to bloom in mid June.
 

Here is Late Summer, featuring Black-eyed Susan and some Bluets.


And here is the final section, Late Fall, for which I chose mums.  I gave this section a frosty background since night frost is not uncommon during that time of year. 

I hope you enjoyed this newest Carousel card.  As always, I encourage your feedback! 

Sunday, March 31, 2013

Happy Easter!


This Easter arrangement started with a simple circle.  I used the new Martha Stewart Circle Punch, which I picked up at Michaels with a 50% off coupon, to punch out the circle design and then folded it into a triangle.  All the flowers are my own creations, the daffodils were made with Crepe paper.  I can't think of a better occasion to display dog wood blossoms, can you?

Happy Easter!

Sigi

challenges:
 The Squirrel and the Fox- Easter or Passover
One Stop Craft Challenge- Easter
4 Crafty Chicks- Easter 
Alphabet Challenge blog- D is for Daffodils 


Saturday, March 30, 2013

First true Carousel Pop-up card

It has only taken me about 50 or so hours to finally figure out how to make a true pop-up Carousel card.  I knew there was a way, I just couldn't figure out how to get the angles right.  Then, last night, a lightbulb went on and I saw it with my mind's eye.  Sat down and worked on it until it "fit."  At last, I got it right...

Creating this card has been another all-nighter, but I wanted to finish it.  It was quite finicky work, and it took quite a while to complete.  But, here it is, and what better subjects than my wildlife youngsters!

I hope you enjoy this little video.  Happy Easter, everybody!

Sigi

Tuesday, March 26, 2013

My most ambitious Carousel Card yet!


Hi everybody, and welcome, new followers!

I just have to show my latest creation, this time it is an all floral Carousel card.  This is the result of about 15 hours of work, and I am pretty proud of it.  

The problem with a carousel card is that you can't just implement a reverse pop-up technique because you also are working on a triangle, so when the card folds closed, everything shifts diagonally in additon to folding up.  That is probably why the cards that I've seen on YouTube thus far while pretty are fairly basic, with embellishments stuck to the sides and a greeting or something decorative stuck to half of the floor. 

I wanted to see how far I can take this, and this card is the answer as of this date.  I decided on an all floral card, and I hope you like this card as much as I do.  It's kind of a mini showcase for my flowers although, needless to say, I had to omit dimensional blossoms since they wouldn't allow for folding. 

My mind is already working out the next card's theme, but I will need to focus on making on or two Mother's Day cards with this design. 

I will offer this card for sale in my Etsy shop, haven't quite decided on a price just yet.  Maybe you could all help me out by letting me know if this is something you would buy . This particular card is a standout in that I will not tackle again such an involved card anytime soon.   In the meantime, I hope you've enjoyed the little video.  Soon I will have to divide my time between working on a new release, items for my Etsy shop, and of course spring babies.  Once the first ones arrive they will be my top priority. 

The story of the opossum baby and the squirrels

I've been trying all afternoon and evening to upload a video, first to the blog and then, when that didn't work, onto YouTube.  It's still not published, but I'm not giving up just yet.

In the meantime, I dug around and found this clip I took a few years ago when a single, still nearly hairless and pink, baby opossum boy arrived.


 I could not get him to stay sufficiently warm and comfortable with just a heating pad, so I decided to stick him in with a litter of 3 week-old baby squirrels.  It was his only chance at survival.  He snuggled right in with his new litter mates and from that point on he ate well and thrived.

When it was time to move the squirrels downstairs into my rehab room and into the cage you see in the video, i felt it was time to separate the little opossum from his a bit unorthodox nest mates.  But he started to run around in circles and cried out for his litter mates and would not stop crying.  He also would not eat.  I realized that he was too young to be alone and put him back with "his" squirrels.  He was elated and they seemed to like seeing him back as well.

A few weeks later, when the squirrels were 12 weeks old, I moved them outside into their pre-release cage, and at this point the opossum was also old enough to manage by himself.  This time he didn't cry non-stop when he found himself alone, and eventually he, too, was released back into the wild.

In nature squirrels and opossums usually do not meet unless an opossum climbs a tree and tries to get at a nest of newborns.  I doubt that by the time I released him he even remembered his litter mates.  He was a pretty little guy, though, and very sweet.

Monday, March 25, 2013

Easter Carousel Card

I'm having so much fun with this carousel card design that I wanted to make an Easter card for my son and daughter-in-law and my two grandsons.  Jenee wanted to see what else I make, so here it is.  Narration is probably terrible, it's 5am and my tongue doesn't want to work so well at this hour. 

I made a bunch of these little inlay eggs thinking people might like them on my Etsy shop, but it seems to take a while to be found by potential customers, so I keep my fingers crossed. 

The bunny is part of the small Cheery Lynn Easter basket, the flowers are from my handmade stash. 

I hope they will like this little card, what do you think? 

Sunday, March 24, 2013

Memory Box Flower Bundle Release

Wow, two releases back to back!  I didn't expect this one to come out this weekend, it's been a while since I had made all these items.  Darlene did a wonderful video, thank you so very much, Darlene!  Here is the link to the video:  http://dutchpapercrafts.blogspot.com/2013/03/reddy-3d-decopauge-easel-card-kits-and.html.  There are two videos in this release, the other one was done by Carol who did a fabulous job!

I will stay in sequence with the video, so here is the first card which features the honey blossoms and my sweet boy Tubby.  If you go back on my blog to March and April last year you will find his story, and every word is true.  I never add or embellish my wildlife rehabilitation stories, I don't need to.  The animals live and tell these stories, I merely write them down...
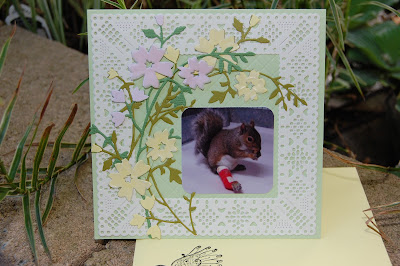
The honey blossoms die is very, very pretty and versatile.  Since I chose a white frame I wanted to keep the blossoms also in light pastels.  Wax paper makes for a very inexpensive yet pretty overlay and adds a whispiness to the blossoms that makes you almost smell their light scent.  Try it with dainty blossoms, but only glue it down in the center, I'm sure you'll like the effect.  -  I took these pictures at our little pond out back and had to look at the date:  this release was done last September, in case you're wondering about the plants around the cards...  Of course Darlene plans her releases around the seasons, which makes complete sense. 

Next is what Darlene thought looks like clover.  Hmm, I hadn't thought of that, now I wish I had!  But here I wanted to show what can be done with this die, which cuts out a negative.  Unlike Darlene I am not a huge fan of negative dies, but given the right treatment they really do add a lot.  Darlene got it right, I did cut around the negative to get the outline and on the yellow blossom in front I  ran the die through twice, once in the green and once in a light yellow, then again cut out the outline and pieced the yellow in. I like the effect on the finished card. 


The Prim Poppies were fun to work with.  But I like dimension, I think you know that by now about me, so I went searching in my craft area for the crepe paper rolls I had picked up at a dollar store.  I looped about 7 or 8 layers together and cut them out with the die, then trimmed just the blossom part and glued that onto the existing poppy blossom.  A few tiny drops of glue hold the layers in place.  I hand painted and stamped the background to create the meadow.  This card was very easy and fun to make. 
 
You can see the handmade envelope that went with the card.  I like to coordinate the envelopes, but most of the cards that I sell in my Etsy store come with a small squirrel stamped in the lower left front corner.  Of course, if someone doesn't want that, I'll make a plain envelope!


The cherry blossoms were fun to work with.  These are fairly large blossoms, which is why I chose to make the placque instead a regular size card.  When I make cards I make other, smaller blossoms, check my store and take a look, I have at least one card up that shows cherry blossoms.  These here from Cheery Lynn are very showy and dimensional, so special treatment was in order.  I sprayed the finished placque with a preservative so that the flowers won't wilt in humid weather.  -  Quite often less is more, in this case all I needed was a branch of cherry blossoms and a butterfly...
 
And then there was the surprise box...
 
I hail from Germany, so of course I know a little bit about Holland, or the Netherlands, as it is called here in the States.  So sending me tulips had me thinking of Holland, of course, and the endless seas of tulip beds in the spring.  The box kind of came about as I went along building this piece, and in case you're wondering what took the longest time to make:  it was the tulip bed to the right of the windmill.  Wish I'd had at least five of these dies to cut several blossoms at once, not one at a time... 
 

The windmill also "came about" as I played around with little sticks.  I ended up gluing the blades like ladders, and at the time I didn't have the great glue I use now which grabs hold rapidly and glues securely.  So this was a game of patience, but eventually I had the four blades.  The body of the windmill is cardboard overlaid with balsa wood chips you can buy in a baggie at Michaels.  I added color with distress ink to bring out the wood work a bit more. 
 
That Cheery Lynn Enchanted Forest border die is GORGEOUS!  Wish they'd change the picture of that die, because it does not do the die any favors.  I stayed away from it for a long time because of that awful picture, but someone convinced me it's a pretty die, and I'm so glad I believed it!  Very dainty and crisp, there are several dies in the set for different size cards.  I highly recommend that die, don't let that ugly picture deter you. 
 
The inner circle on the front cover is part of the Cheery Lynn border die on my first card, and both pieces cut out together but stay separate.  I just put a smaller piece of paper on the die to cut out only the center piece. 
 
I'm sure that Petra, our Dutch design team member, will get a kick out of my windmill. 
 
If you need numbers to the dies I used, please do not hesitate to contact me or Darlene.  It's late, and I wanted to get this blog up quickly. 
 
I hope you enjoyed this release and welcome any and all comments!!!  Thank you for watching and reading, and happy crafting!
 
Sigi